Species: freshwater, saltwater
Video: Version by Kirk Dietrich
Remarks by Catch Cormier
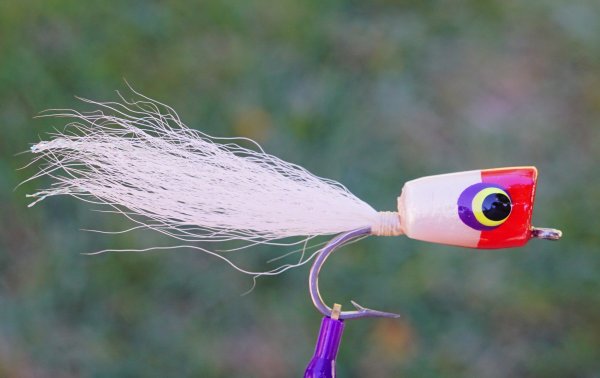
The Perch Float Popper is one of the best poppers for reds in the marsh. Cast it in front of a cruising fish, give it just a slight strip, pause, and then watch the red submarine on it. Witnessing a redfish eat a popper is one of the awesome spectacles of nature! Speckled trout and bass love them too, especially early and late, on overcast days, and on warm afternoons in winter along edges of lakes and canals.
This is a fly that lends itself to assembly line production: do a half-dozen or so one tying step at a time. For example, paint the outer eye on each one - by the time the last body is being painted, the first one is near dry. This is the most efficient use of time.
Materials:
Styrofoam perch floats - such as the Comal brand - in either 1 1/2" length or 2" (slightly wide) length. The larger corks are almost always used for saltwater, for choppy conditions, but require a higher weight rod to cast. The smaller floats can be cast with as little as a 3 weight, but a 5 weight is recommended.
A dremel bit tool, conehead sander.
Xacto knife.
Sanding paper, 400 grain is good.
34007 hook size 2 or 34011 size 4 gives it a "top dog" action.
acrylic paint in black, red, white, and other colors.
wooden dowels with different sizes
2-ton or 30 minute waterproof epoxy.
Instructions:

Create a slit by taking the Xacto knife and carefully cutting lengthwise to the center. Take the sandpaper and and pass the edge into the slit, then sand out the slit so it's wide enough to accept a hook. Take the Dremel bit and bore out a cup face in the wide end.
Hook. Tie thread onto a hook where the popper body will sit. Make the wraps open-spaced going down the shank, then come back up the shank also open-spaced and tie off. This creates a wrapping that is uneven, with spots for glue to fill in the cracks. Slide the hook shank into the float slit so that it's about midway to the center hole. Also, try and have the body close to the hook eye so there's room to tie the tail (later) on the hook shank. If the only space left to tie the tail is on the bend of the hook, you'll have to sand/cut some body off or go with a longer hook. Even the body on the hook, then squirt Zap-A-Gap or other instant glue along the slit. Let it sit a few minutes to bond tightly.
Painting. Kirk Dietrich suggest acrylic paints for several reasons: easy cleanup with water, easy to "feather", the combinations are infinite, and they are reasonably cheap. Select a green, blue, or other darker color for the body top. Thin the paint with water. You want to achieve an airbrush look. One way to do this is use a foam sponge. Dip it in the paint, remove the excess by dabbing it on a piece of cardboard until it's basically damp. Then dab it on top the body so a stippled effect is achieved.
Eyes.Use three different diameter dowels, or one size sharpened to three different sizes, dip the largest diameter into red paint. Then apply it to the front of the body on each side. To get a good circle, you may have to rotate the dowel a bit. After dried, dip the smaller diameter dowel into white paint. Apply it so that the outer edge of the white dowel is even with the edge of the red circle on the head end. Then dip the smallest dowel into black paint. Apply it so the outer edge of the black dowel is even with the edge of the red/white circle on the head end.
Other painting. You might use a fine brush to paint gills just behind and slightly under each eye. You might use the black dowel to paint a spot on the tail end.
Epoxying. Make sure everything is dry on the bodies. Squirt out about a quarter's size of mixed epoxy (hardener and resin) onto cardboard or aluminum foil. Mix with a toothpick or half of a wooden mixing stick. Take a brush and apply a thin coat over the body. Make sure to fill in the crack where the body slit was made. Apply some to the cupped face as well. Do this quickly and then put the body on your turning apparatus.
Drying apparatus. If you use 2-ton or waterproof epoxy, you're looking at 30 minutes before the epoxy dries. Until then, the flies must be turned to avoid sagging. Epoxy fly dryers are available from Cabelas and most fly shops that carry saltwater tying materials. A DIY dryer can be made from a barbecue rotissiere and a block of foam (pool noodle foam works great). Kirk offers a cheap alternative: put toothpicks into both sides of a foam, and manually turn the foam over every five (5) minutes. This is what I did when I first started and it works good. But if you start doing lots of epoxy flies, the turning apparatus will be much more convenient.
Give the poppers about a day before they are really abrasion-resistant to the teeth of speckled trout.
Best Colors. My favorite color is green/white just about all year long. But in winter or in dark water, I like to go with a black/gray. This requires applying gray to the entire body as a first step. Another good combination is a red band around the front of the body with white on the backside. And of course, an all-chartreuse body works because "speckled trout like any color as long as it's chartreuse"!