Friday, January 07, 2000

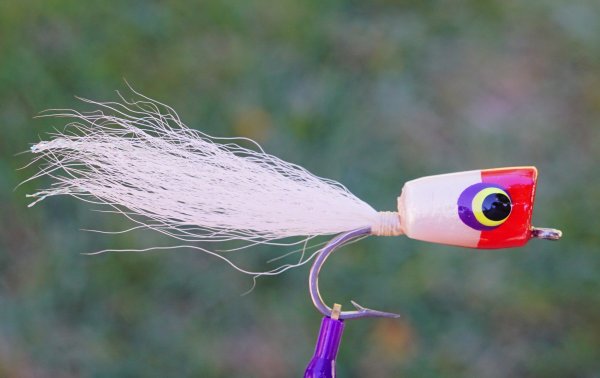
Pete's Perch Float Popper

Originator: Pete Cooper, Jr.

Species: freshwater, saltwater


Video: Version by Kirk Dietrich

Remarks by Catch Cormier

The Perch Float Popper is one of the best poppers for reds in the marsh. Cast it in front of a cruising fish, give it just a slight strip, pause, and then watch the red submarine on it. Witnessing a redfish eat a popper is one of the awesome spectacles of nature! Speckled trout and bass love them too, especially early and late, on overcast days, and on warm afternoons in winter along edges of lakes and canals.

This is a fly that lends itself to assembly line production: do a half-dozen or so one tying step at a time. For example, paint the outer eye on each one - by the time the last body is being painted, the first one is near dry. This is the most efficient use of time.

Materials:

Styrofoam perch floats - such as the Comal brand - in either 1 1/2" length or 2" (slightly wide) length. The larger corks are almost always used for saltwater, for choppy conditions, but require a higher weight rod to cast. The smaller floats can be cast with as little as a 3 weight, but a 5 weight is recommended.

A dremel bit tool, conehead sander.

Xacto knife.

Sanding paper, 400 grain is good.

34007 hook size 2 or 34011 size 4 gives it a "top dog" action.

acrylic paint in black, red, white, and other colors.

wooden dowels with different sizes

2-ton or 30 minute waterproof epoxy.
 
Instructions:
 
Body Using a Xacto knife, cut the perch float in half. Most of these floats come with a white end and a red end. I use the white end for this popper and save the red end for VOSIs, aka the flyfishers popping cork.

Create a slit by taking the Xacto knife and carefully cutting lengthwise to the center. Take the sandpaper and and pass the edge into the slit, then sand out the slit so it's wide enough to accept a hook. Take the Dremel bit and bore out a cup face in the wide end.

Hook. Tie thread onto a hook where the popper body will sit. Make the wraps open-spaced going down the shank, then come back up the shank also open-spaced and tie off. This creates a wrapping that is uneven, with spots for glue to fill in the cracks. Slide the hook shank into the float slit so that it's about midway to the center hole. Also, try and have the body close to the hook eye so there's room to tie the tail (later) on the hook shank. If the only space left to tie the tail is on the bend of the hook, you'll have to sand/cut some body off or go with a longer hook. Even the body on the hook, then squirt Zap-A-Gap or other instant glue along the slit. Let it sit a few minutes to bond tightly.

Painting. Kirk Dietrich suggest acrylic paints for several reasons: easy cleanup with water, easy to "feather", the combinations are infinite, and they are reasonably cheap. Select a green, blue, or other darker color for the body top. Thin the paint with water. You want to achieve an airbrush look. One way to do this is use a foam sponge. Dip it in the paint, remove the excess by dabbing it on a piece of cardboard until it's basically damp. Then dab it on top the body so a stippled effect is achieved.

Eyes.Use three different diameter dowels, or one size sharpened to three different sizes, dip the largest diameter into red paint. Then apply it to the front of the body on each side. To get a good circle, you may have to rotate the dowel a bit. After dried, dip the smaller diameter dowel into white paint. Apply it so that the outer edge of the white dowel is even with the edge of the red circle on the head end. Then dip the smallest dowel into black paint. Apply it so the outer edge of the black dowel is even with the edge of the red/white circle on the head end.

Other painting. You might use a fine brush to paint gills just behind and slightly under each eye. You might use the black dowel to paint a spot on the tail end.

Epoxying. Make sure everything is dry on the bodies. Squirt out about a quarter's size of mixed epoxy (hardener and resin) onto cardboard or aluminum foil. Mix with a toothpick or half of a wooden mixing stick. Take a brush and apply a thin coat over the body. Make sure to fill in the crack where the body slit was made. Apply some to the cupped face as well. Do this quickly and then put the body on your turning apparatus.

Drying apparatus. If you use 2-ton or waterproof epoxy, you're looking at 30 minutes before the epoxy dries. Until then, the flies must be turned to avoid sagging. Epoxy fly dryers are available from Cabelas and most fly shops that carry saltwater tying materials. A DIY dryer can be made from a barbecue rotissiere and a block of foam (pool noodle foam works great). Kirk offers a cheap alternative: put toothpicks into both sides of a foam, and manually turn the foam over every five (5) minutes. This is what I did when I first started and it works good. But if you start doing lots of epoxy flies, the turning apparatus will be much more convenient.

Give the poppers about a day before they are really abrasion-resistant to the teeth of speckled trout.

Best Colors. My favorite color is green/white just about all year long. But in winter or in dark water, I like to go with a black/gray. This requires applying gray to the entire body as a first step. Another good combination is a red band around the front of the body with white on the backside. And of course, an all-chartreuse body works because "speckled trout like any color as long as it's chartreuse"!

Thursday, January 06, 2000

Coma Spoon


Originator: Catch Cormier

Version by Catch Cormier

Species: bass, white bass, inshore brackish

Remarks by Catch Cormier:


Most spoon flies, such as Cave's Wobbler or Kirk's Spoon, are "wobblers". That is, the fly wobbles side-to-side when stripping. The Coma Spoon and the Kirshner Spinner are "spinners". That is, the fly rotates.

The Coma Spoon has a longer, narrower body than Kirk's Spoon, so it sinks faster. On a strip, the fly rotates one direction. During the pause between strips, the fly rotates back the other direction. To insure enough tension to make this happen, tippets used for the Coma Spoon should be no less than 12 pounds.

Spinner spoons are not as weedless as wobbler spoons, but as mentioned, they do sink faster. This makes them better suited for fishing canal banks and lake shorelines.

Materials:
- Mustad 34011 stainless hook, size 1.
- 1/4" mylar tubing (Wapsi Large).
- red thread
- 5 minute epoxy
- 30 minute (2 ton) transparent epoxy
- Best colors for mylar: gold, pearl, flashabou (gold/pearl), green.

Instructions:

Using a pair of pliers, make a series of slight bends in the hook until it assumes a somewhat "caddis" shape. Wrap thread base from eye back to halfway down bend of hook. Cut 1 3/4" section of mylar and slide down shank from front until any unraveled endings are past thread. Secure mylar at bend with thread and knot off with a whip finish. Mix together a tiny amount of 5 minute epoxy. Using a toothpick, dab some epoxy into the mylar. Make sure to cover as much surface as possible, and especially towards the back. You now have about 3 minutes to work with. Place thread over mylar about 1/8" down from the hook eye, and make 3 to 4 tight wraps. With rough pair of scissors, trim off excess mylar covering the hook eye, then wrap thread over end of mylar to form head. By now, the 5 minute epoxy should be ready. Don on pair of rubber gloves, then press mylar flat. Keep working the mylar as the epoxy begins to set. After the mylar is nice and flat, take the hook out. Make a twist in the mylar (about 30-45 degrees). Allow to set further. Later, using a brush, apply 30 minute epoxy to the outside of the fly to make it waterproof, durable, and shiny.


Wednesday, January 05, 2000

LaFleur's Charlie

Charlie Originator: Bob Nauheim

Version by Mike LaFleur

Species: inshore brackish

Remarks by Mike LaFleur:

This is not an original fly designed by me.The original Charlie was developed in the 1950’s for Bob Nauhiem and named after his Bahamian guide Charlie Smith, who tied it for him.

There are many variations of this fly, but they are all basically an inverted hook pattern. After many years of experimentation and field testing, this is how I tie my Charlie for redfish, speckled sea trout and flounder in the Louisiana saltwater marsh. It meets my three standards for a fly: 1) It is easy to tie; 2) It is durable; and 3) It catches fish.

Materials:

HOOK: #2 Mustad 34007 or #2 Mustad Signature C71S SS circle streamer

EYES: Lead dumbbell eyes painted red with black ends. I use the Wapsi brand sold at many fly shops and catalogues. The size and weight is most important. I use size X-SM with a 5/32 diameter, weighing about 1/50 of an ounce. A change in the weight will change the up and down motion of the fly in the water column. Lately, you can only find 1/40 or 1/60 ounce eyes. They both work OK. Use the red/black for the pink and chartreuse Charlies and yellow/black for the black Charlie.

THREAD: Danville’s Waxed Flymaster Plus -210 Denier thread or a 3/0 light pink thread.

BODY: For the pink and chartreuse Charlies, use pearl colored Long Flash Crystal Chenille. You can also use Umpqua’s pearl Estaz. For the black Charlie, I use black opalescent Estaz Grande for a fuller body.

WING: Craft Fur. Wapsi makes a good light pink craft fur CRF 104, and black CFR 100, but no chartreuse. Hareline makes a good chartreuse XCF54.

Instructions:

1. Put the hook in the vice with the hook down (the normal way). Tie in the thread behind the eye of the hook and wrap down about half of the hook shank and then back towards the eye to about one lead eye length from the eye of the hook, leaving enough room for a nice head. Tie in the lead eye using figure eights, etc.

2. Tie off the thread and remove the hook from the vice.

3. Coat the wraps that hold the dumbbell eye on the hook with super glue. I use Zap-A-Gap CA+, and I usually do a batch at a time.

4. After the glue is dry, put the hook back in the vice with the hook point down and the lead eye on top. Tie in the thread behind the lead eye and wrap back to the bend above the barb. Tie in the Crystal Chenille using several tight wraps to make it secure. Then advance the thread to behind the lead eye. Wrap the Chenille forward in close wraps to the lead eye. Make several tight wraps of the thread and cut off the excess Chenille. Bring the thread in front of the lead eye and then take the hook out of the vice and turn it over so the lead eye is down and the hook point is up.

5. Take the patch of Craft Fur and grab some of the strands that, when twisted together at the base, will be about 1/8 inch in diameter. Cut off as close to the base as possible. This will give you a length of about twice the length of the hook shank. Tie in the Craft Fur in between the lead eye and the eye of the hook, on the hook point side of the hook (on the top as it is sitting in the vice). Continue wrapping the thread between the lead eye and the eye of the hook to form a nice conical head. Whip finish and cut off the thread. Coat the head with head cement. I use Hard as Nails.


Tuesday, January 04, 2000

Jitterbee

Originator:  Randy Leonpacher

Species:  Bluegill, redear, crappie

Remarks by Randy Leonpacher:

The Jitterbee is an excellent bead head nymph that looks like a bee with a cricket-like tail. Best colors are black/orange, black/red or black/chartreuse. This bug is my first line of offense for bream. It can be fished deep or under a strike indicator. In either case don't set your rod down 'cause once the bream get sight of this bug its gone pecan....

Materials:

- Eagle Claw Baitholder #080 in size 8 or 10. The Eagle Claw 181 baitholder hook can be used as a substitute. Both are 2X heavy and have large eyes suitable for the large metal bead.
- 4mm 10K gold plated metal bead (I prefer the Halcraft brand found at hobby stores).
- Medium chenille or fine chenille (vernille) in black, red, burnt orange, or chartreuse. The medium is right for the size 8 hook, the fine is perfect for the size 10 hook.
- Black silicon rubber skirt material.

Instructions:

1) Smash the hook shank barbs on the Baitholder hook and straighten the slight bend/offset.
2) Bend the hook point enough to slide the bead on, then bend back to normal.
3) Wrap hook shank with thread and tie short piece of silicon rubber leg -- about 1/3 of a single strand. Double over short piece to make a forked tail. Secure with thread.
4) Pair up and tie in one color chenille with another color. Secure them with thread back to the v-tail. Contrasting colors always work best, such as black/chartreuse or black/orange.
5) Wrap paired chenille forward around hook to form banded colors.
6) Secure chenille by tying in just behind bead head.
7) TIP: add a small amount of head cement on thread before putting final wraps to give it extra resiliency. You'll need it if your jitterbee is to have any chance of survival after it's been viciously assaulted by a few dozen gobbules!